Official update notice - Version 2
Secure E-mail Notifications for Fail2Ban (Version 2)
Last revision date:
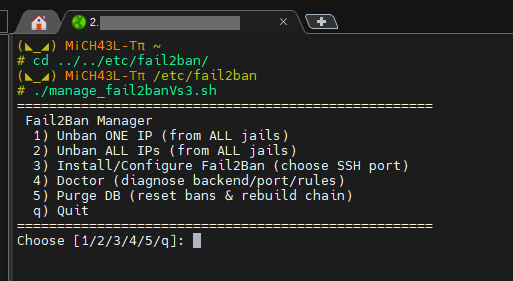
Official update notice - Fail2Ban Manager Script Version 3
Fail2Ban Manager Script (Version 3)
Last revision date:
- Interactive SSH port prompt with auto-detection and override.
- Forced firewall action with iptables or nft backend auto-detection and guaranteed INPUT to
f2b-sshdjump. - One-click unban for a single IP across all jails or all bans.
- Optional Gmail notifications with sender, recipient, and App Password prompts.
- Automatic HTML email reports for SSH connection attempts and bans, including WHOIS, reverse DNS, username, authentication method, and correlated log snippet.
- Purge DB utility to wipe malformed bans and rebuild chains safely.
- Built-in doctor for backend, port, rules, and logs diagnostics.
- Hardened flow with best-effort installs, safe fallbacks, and resilience to missing tools.
Abstract
This document provides a comprehensive and structured guide to configuring Fail2Ban on Ubuntu-based Virtual Private Servers with secure email notification capabilities through Gmail SMTP, Gmail API (OAuth2), and improved configurations such as Telegram or Discord alerts, WHOIS geolocation, and multi-service protection.
The goal is proactive intrusion detection and immediate administrative awareness of unauthorized access attempts, using lightweight configurations without requiring additional mail transfer agents.
1. Introduction
Fail2Ban is a widely adopted intrusion prevention framework that monitors system logs for malicious authentication attempts. When it detects suspicious behavior, it dynamically updates firewall rules to temporarily ban the attacking IP address.
2. Prerequisites
- Operating System: Ubuntu 22.04.5 LTS or newer
- Software: Fail2Ban installed via APT
- Account: Gmail account with 2-Step Verification enabled
- Optional: Google Cloud project with Gmail API enabled for OAuth2 authentication
- No local MTA: A Mail Transfer Agent is not required
3. Fail2Ban Installation
sudo apt update
sudo apt install fail2ban -y
sudo systemctl enable fail2ban
sudo systemctl start fail2ban
sudo systemctl status fail2ban
4. Gmail SMTP Configuration
4.1 App Password Setup
- Enable 2-Step Verification in your Google account.
- Go to https://myaccount.google.com/apppasswords.
- Generate a password for "Mail".
- Copy and store it securely.
4.2 Fail2Ban Action File
Create the action file:
sudo nano /etc/fail2ban/action.d/sendmail-gmail.confInsert:
[Definition]

actionstart =
actionstop =
actioncheck =

actionban = /etc/fail2ban/send_gmail.py <name> <ip> <fq-hostname> ban
actionunban = /etc/fail2ban/send_gmail.py <name> <ip> <fq-hostname> unban

[Init]
4.3 Integration with jail.local
[DEFAULT]
bantime  = 10m
findtime = 10m
maxretry = 3

action = %(action_mwl)s
         sendmail-gmail[name=SSH, dest=youraddress@gmail.com, sender=youraddress@gmail.com]

[sshd]
enabled  = true
port     = ssh
logpath  = /var/log/auth.log
banaction = iptables-multiport
5. Gmail API (OAuth2)
This option secures email delivery without storing SMTP passwords directly in plain configuration files.
5.1 Setup
- Access Google Cloud Console.
- Enable Gmail API.
- Create an OAuth Client ID as a Desktop App.
- Download
client_secret.json.
5.2 Python Script
#!/usr/bin/env python3
import smtplib, ssl, sys
from email.mime.text import MIMEText
from email.mime.multipart import MIMEMultipart
from datetime import datetime

# Parametri da Fail2Ban
jail = sys.argv[1]
ip = sys.argv[2]
hostname = sys.argv[3]
action = sys.argv[4]  # "ban" o "unban"

# Email
subject = f"Fail2Ban: {jail} {action}ned {ip}"
body = f"""Host: {hostname}
Jail: {jail}
IP: {ip}
Date: {datetime.now().strftime('%Y-%m-%d %H:%M:%S')}"""

sender_email = "youraddress@gmail.com"
receiver_email = "youraddress@gmail.com"
password = "YOUR_APP_PASSWORD"

message = MIMEMultipart()
message["From"] = sender_email
message["To"] = receiver_email
message["Subject"] = subject
message.attach(MIMEText(body, "plain"))

context = ssl.create_default_context()
with smtplib.SMTP("smtp.gmail.com", 587) as server:
    server.starttls(context=context)
    server.login(sender_email, password)
    server.sendmail(sender_email, receiver_email, message.as_string())
6. Security Enhancements
- Limit access to sensitive configuration files:
sudo chmod 600 /etc/fail2ban/action.d/sendmail-gmail.conf- Use encrypted credential storage such as
systemd-credentialsor GPG. - Avoid plaintext passwords wherever possible.
7. Example jail.local (SSH + Gmail)
[DEFAULT]
bantime  = 10m
findtime = 10m
maxretry = 3

action = %(action_mwl)s
         sendmail-gmail[name=SSH, dest=youraddress@gmail.com, sender=youraddress@gmail.com]

[sshd]
enabled  = true
port     = ssh
logpath  = /var/log/auth.log
banaction = iptables-multiport
8. Advanced Examples
8.1 NGINX Protection
[nginx-http-auth]
enabled  = true
port     = http,https
logpath  = /var/log/nginx/error.log
maxretry = 3
8.2 WordPress Brute-Force Mitigation
[wordpress]
enabled = true
port = http,https
filter = wordpress
logpath = /var/www/*/logs/access.log
8.3 Telegram Notification
[Definition]
actionban = curl -s -X POST https://api.telegram.org/bot<BOT_TOKEN>/sendMessage \
            -d chat_id=<CHAT_ID> \
            -d text="⚠️ Fail2Ban Alert
Jail: <name>
IP: <ip>
Host: <fq-hostname>
Time: $(date '+%Y-%m-%d %H:%M:%S')"
9. Conclusion
Fail2Ban combined with Gmail, Telegram, or Discord delivers real-time security awareness and active intrusion prevention with minimal system overhead. This GitHub-ready guide provides both basic and advanced configurations suitable for professional and academic environments.